Search results for tag #homeassistant
![[?]](https://files.mastodon.social/accounts/avatars/108/231/775/424/945/550/original/6a1f7d2dc1713cb8.gif)
![[?]](data:image/png;base64, iVBORw0KGgoAAAANSUhEUgAAAEAAAABAAQAAAACCEkxzAAAAUUlEQVQoz43R0QkAMQwCUDdw/y3dwEvsvzlL4X1IoQkAisKmwfAFT3RgJHbQezpSRoXEqeqCL9BJBf7h3QbOCCxV5EVWMEMwG7K1/WODtlvxAYTtEsDU9F34AAAAAElFTkSuQmCC)
I know some #blind people around here have been involved in #3dprinting, and I'd be very grateful for their advice and comments from anyone else. I have two boards which I have gotten firmware for. These are small boards, they connect through USB C, and they work for what I want. My difficulty is that, though they're sold at retail, they are really boards. They don't have any plastic casing around them. I want that casing. I have found designs online which the models say will suit but first, it's a statement from the models, I don't believe it. Secondly, I'm lost on how to produce them at an even reasonable price, let alone about what happens if they don't work. If I may ask, where do I start? I only need three or four prints, I'm not buying a printer just for that. Is there a consultant who won't be absolutely earthshaking in pricing to see whether it will work? Is there some solution I'm missing to figure out which case will work in reality and have it printed? Boosts are very welcome.#accessibility #printing #design #homeassistant
![[?]](https://not-x.g2od.ch/system/accounts/avatars/116/500/915/474/480/041/original/fabd31537eda5f71.png)
Lasse mir die neusten Meshtastic Nachrichten und die Anzahl bekannter Nodes in Home Assistant anzeigen.
Noch nicht implementiert: Akkustand eines entfernten Nodes...
https://github.com/meshtastic/home-assistant
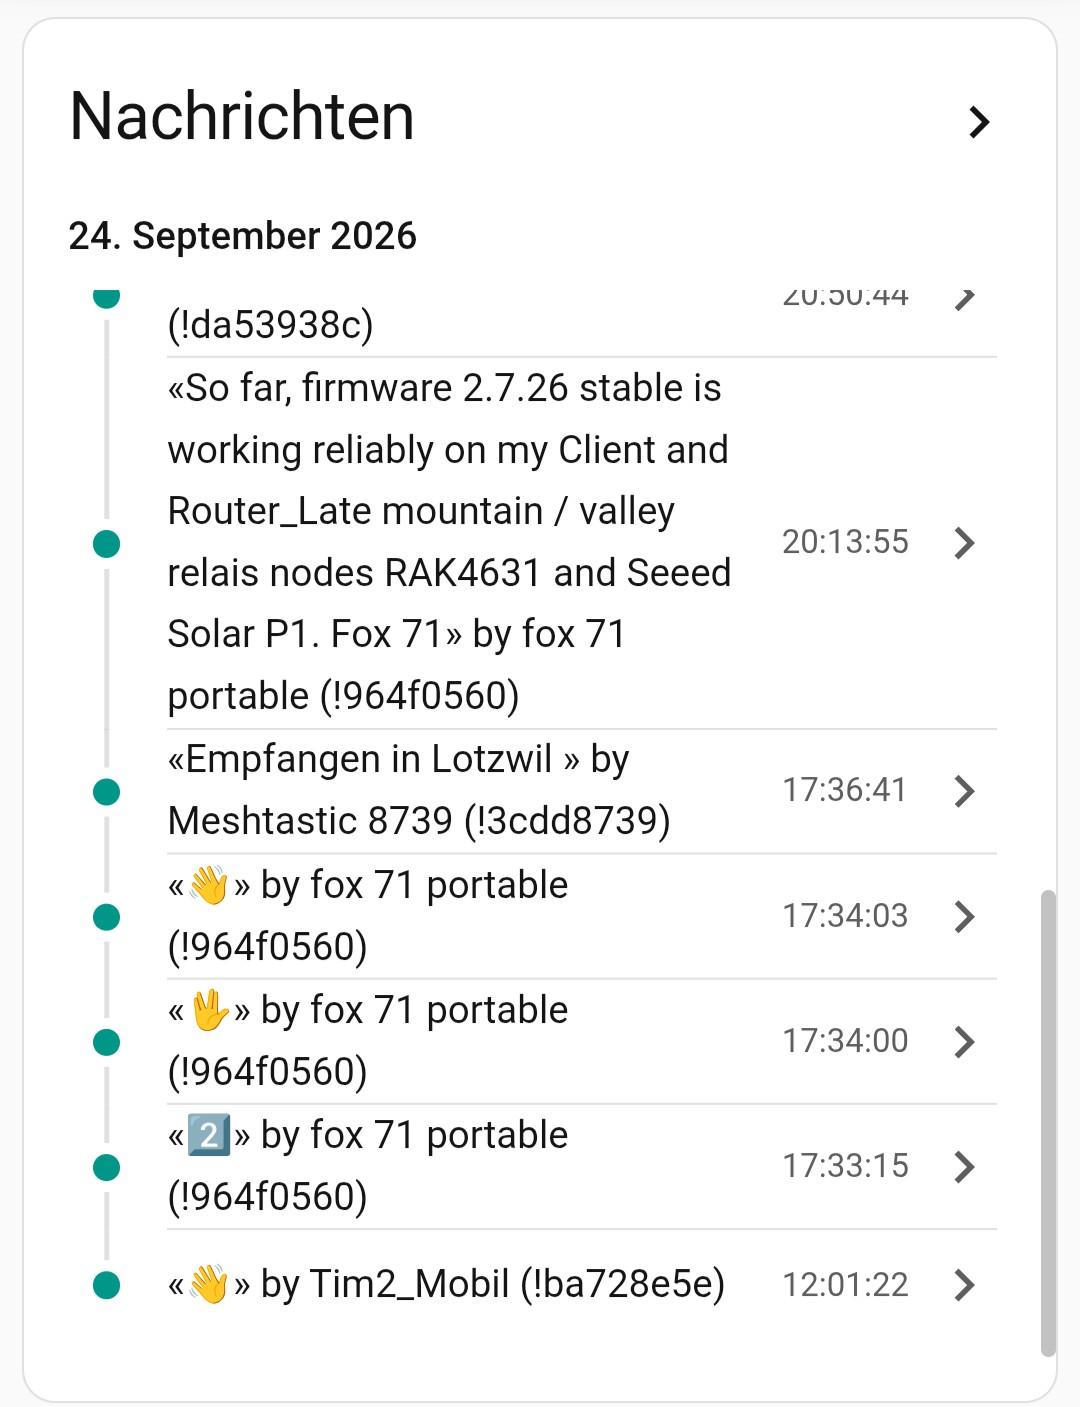
Alt...
Nachrichten Feed
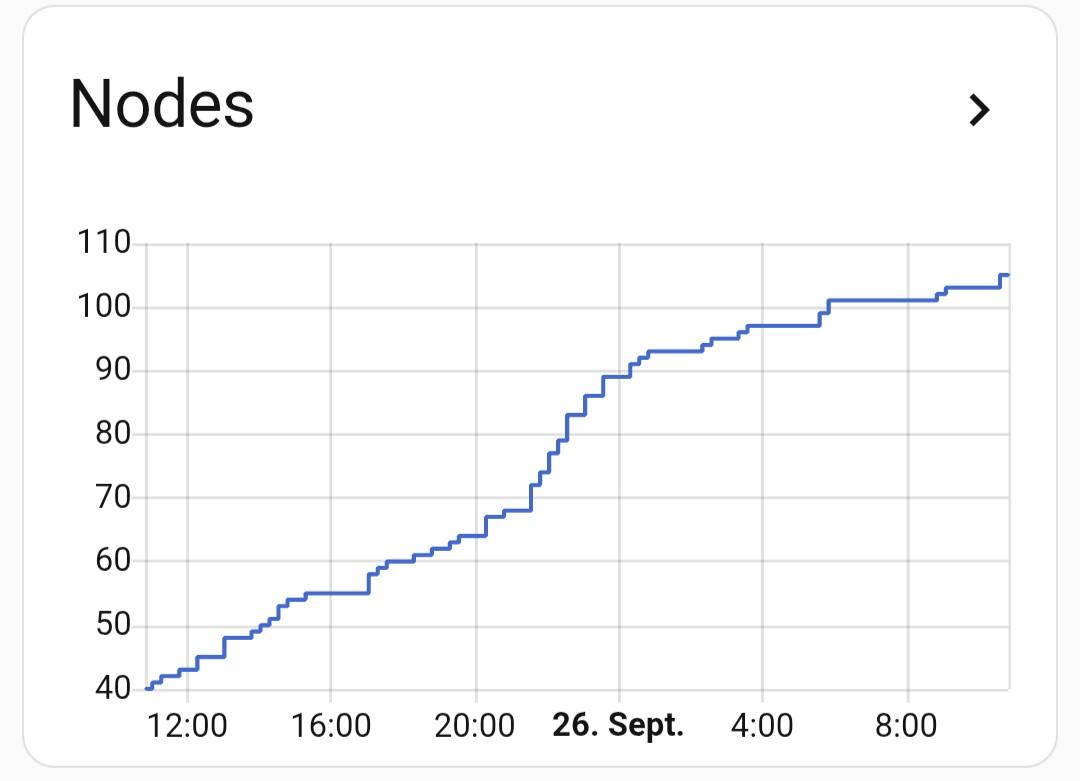
Alt...
Abzahl gefundene Nodes
 𝕤𝕖𝕝𝕖𝕒
𝕤𝕖𝕝𝕖𝕒 
![[?]](https://media.intahnet.co.uk/accounts/avatars/000/000/001/original/2e923f9900aa17fa.png)
#introduction Hello! I'm Hamzah. I'm a #linux/#devops engineer in my day job. I live in #london.
I consider myself a hardcore geek, but these days most of my time is taken up by my three kids and wife.
I'm very interested in automation, and have a small addiction to #ansible, #kubernetes and #HomeAssistant.
![[?]](https://eu2.contabostorage.com/84d52eb49be94e05b1112a5264378089:mastodon-media/accounts/avatars/110/668/921/283/653/966/original/28bb900160f02bff.jpeg)
V1.5 of my Home Screen.
I set up a template sensor in #HomeAssistant to combine the output of various sensors and helpers into a few sentences, with randomised wording and different options for when I’m home or at work, and Widgey can display it for me. Need to tweak the layout/size but I’m pretty happy with it!
It’s not live, iOS widgets only update around every 15 minutes, but it should change throughout the day. It would be awesome if it WAS live, but I’ll cope.
I still plan to add some tappable buttons below the text, and I can use Home Assistant to make them dynamic too (the path for the url can be provided by the same sensor).
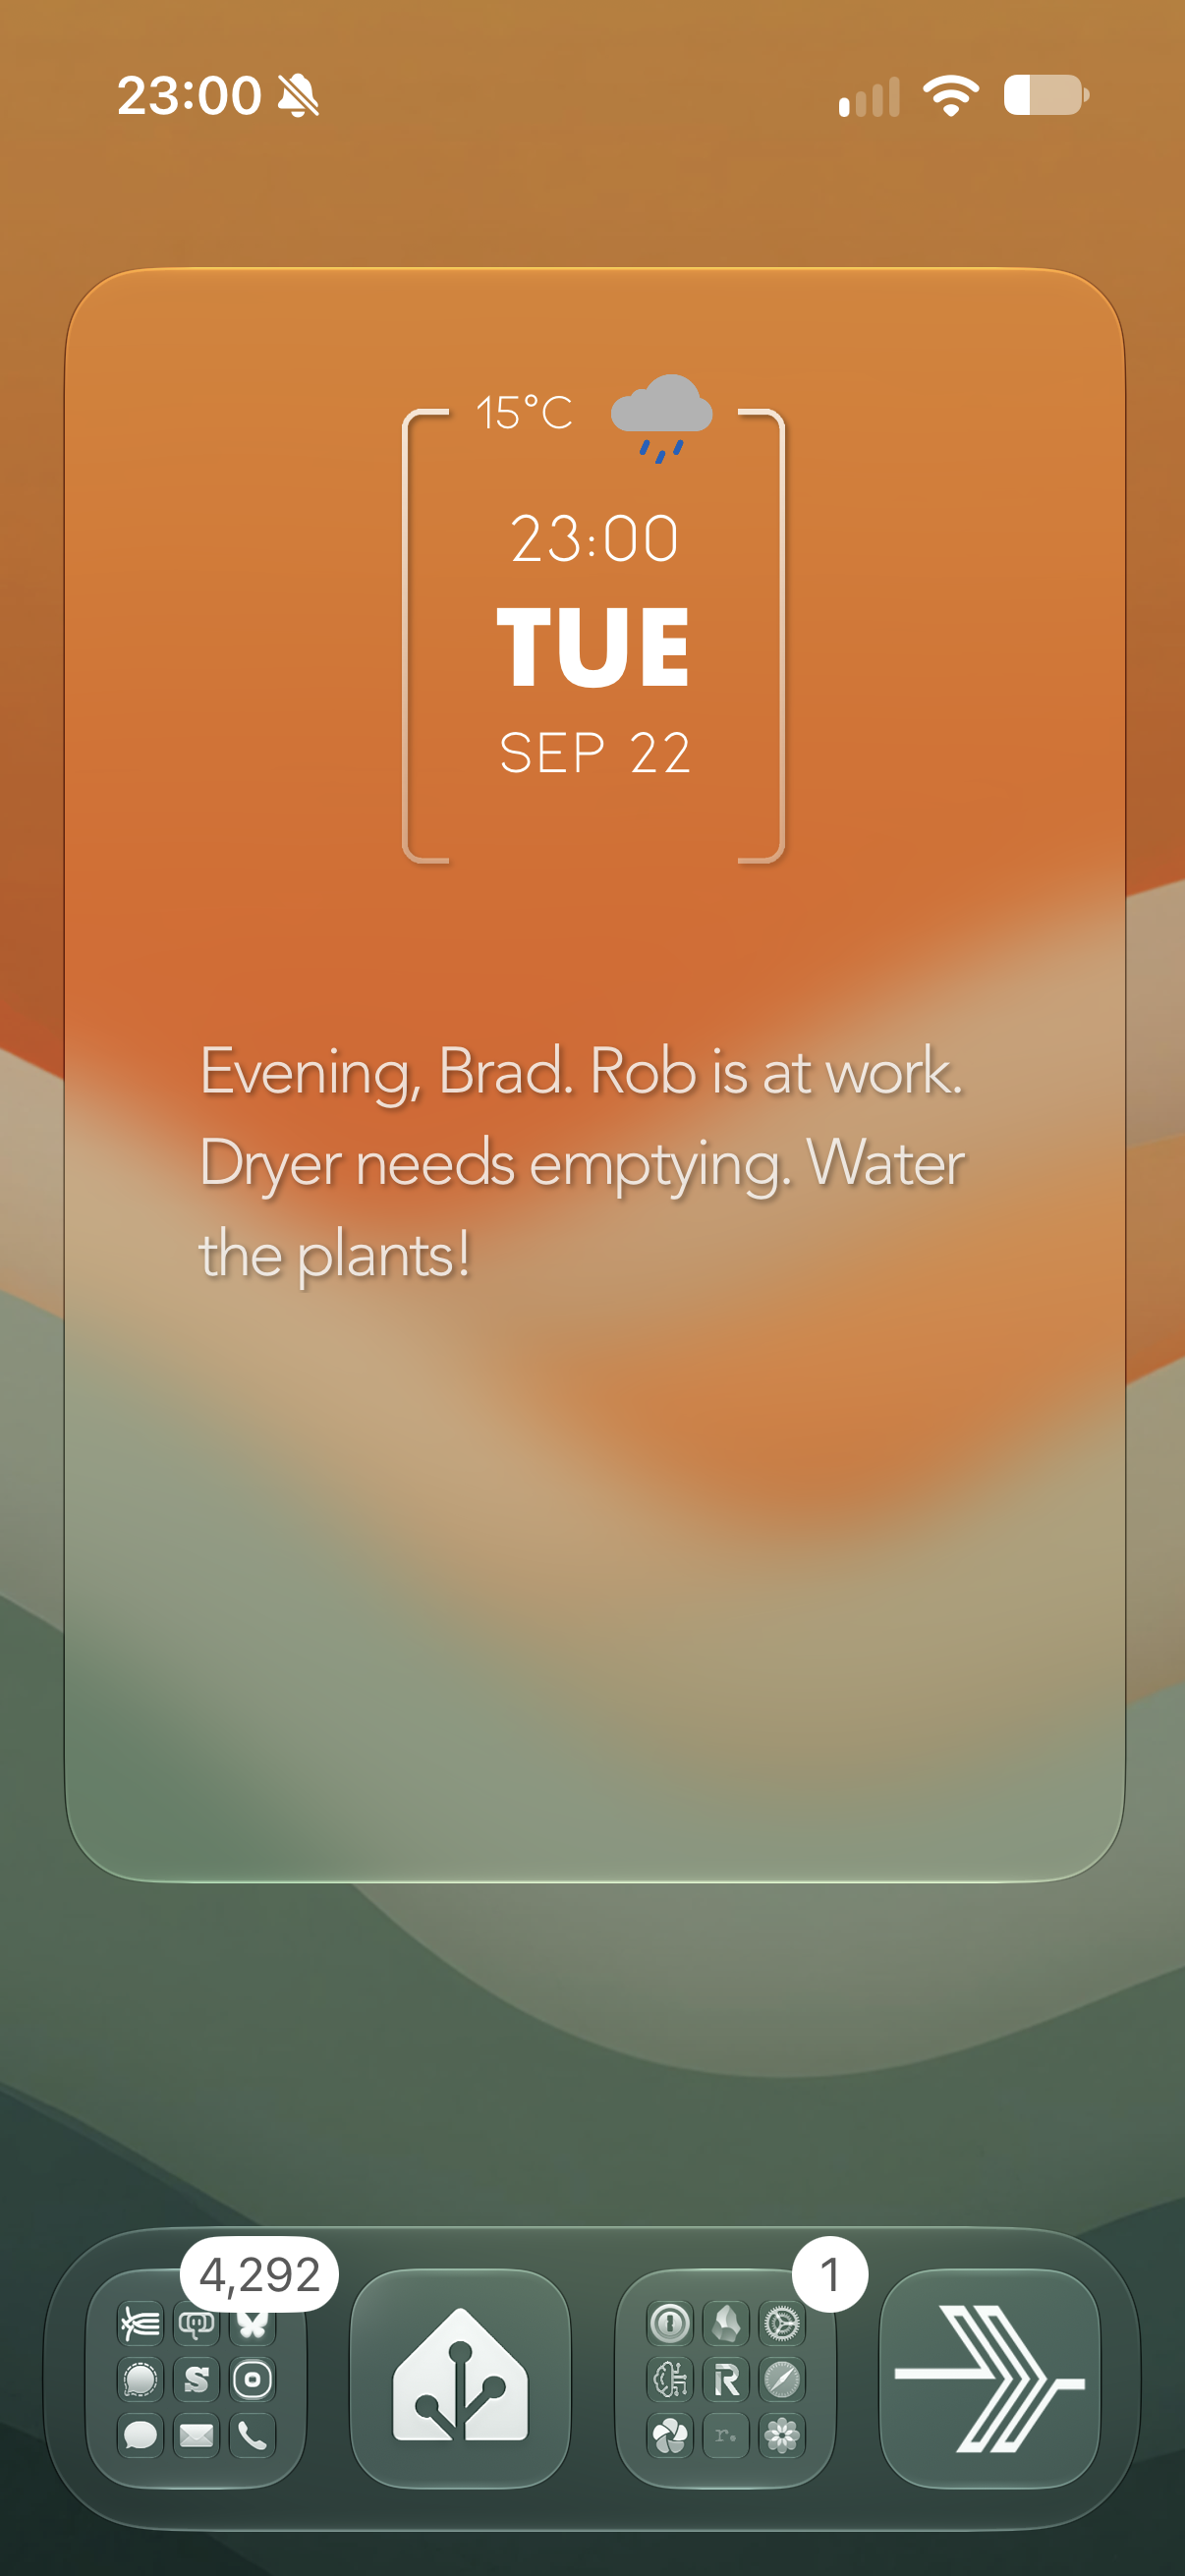
Alt...
My phone Home Screen featuring a large widget with the time and date at the top, and the below that some text which reads:
“Evening, Brad. Rob is at work. Dryer needs emptying. Water the plants!”
![[?]](https://s3.c.im/accounts/avatars/109/309/536/306/748/095/original/5b9868de41c560c5.jpg)
@DamonHD Will read. I had in mind an experimental approach with my new heat pump - do what I'm told for the first winter (leave all the TRVs fully open (except, perhaps, for the room that's never used)) and see how it goes.
And then decide whether to refit the smart heads, controlled by #HomeAssistant , that we were using before (heating each room according to its use at each time of day). And then try something else out next winter. But of course each tweak to this experiment would take a year to evaluate ... (apart from the obvious failures which we abandon early because we get cold).
![[?]](https://bloor.tw/system/accounts/avatars/109/270/268/145/356/367/original/819ce26120a92c4f.jpg)
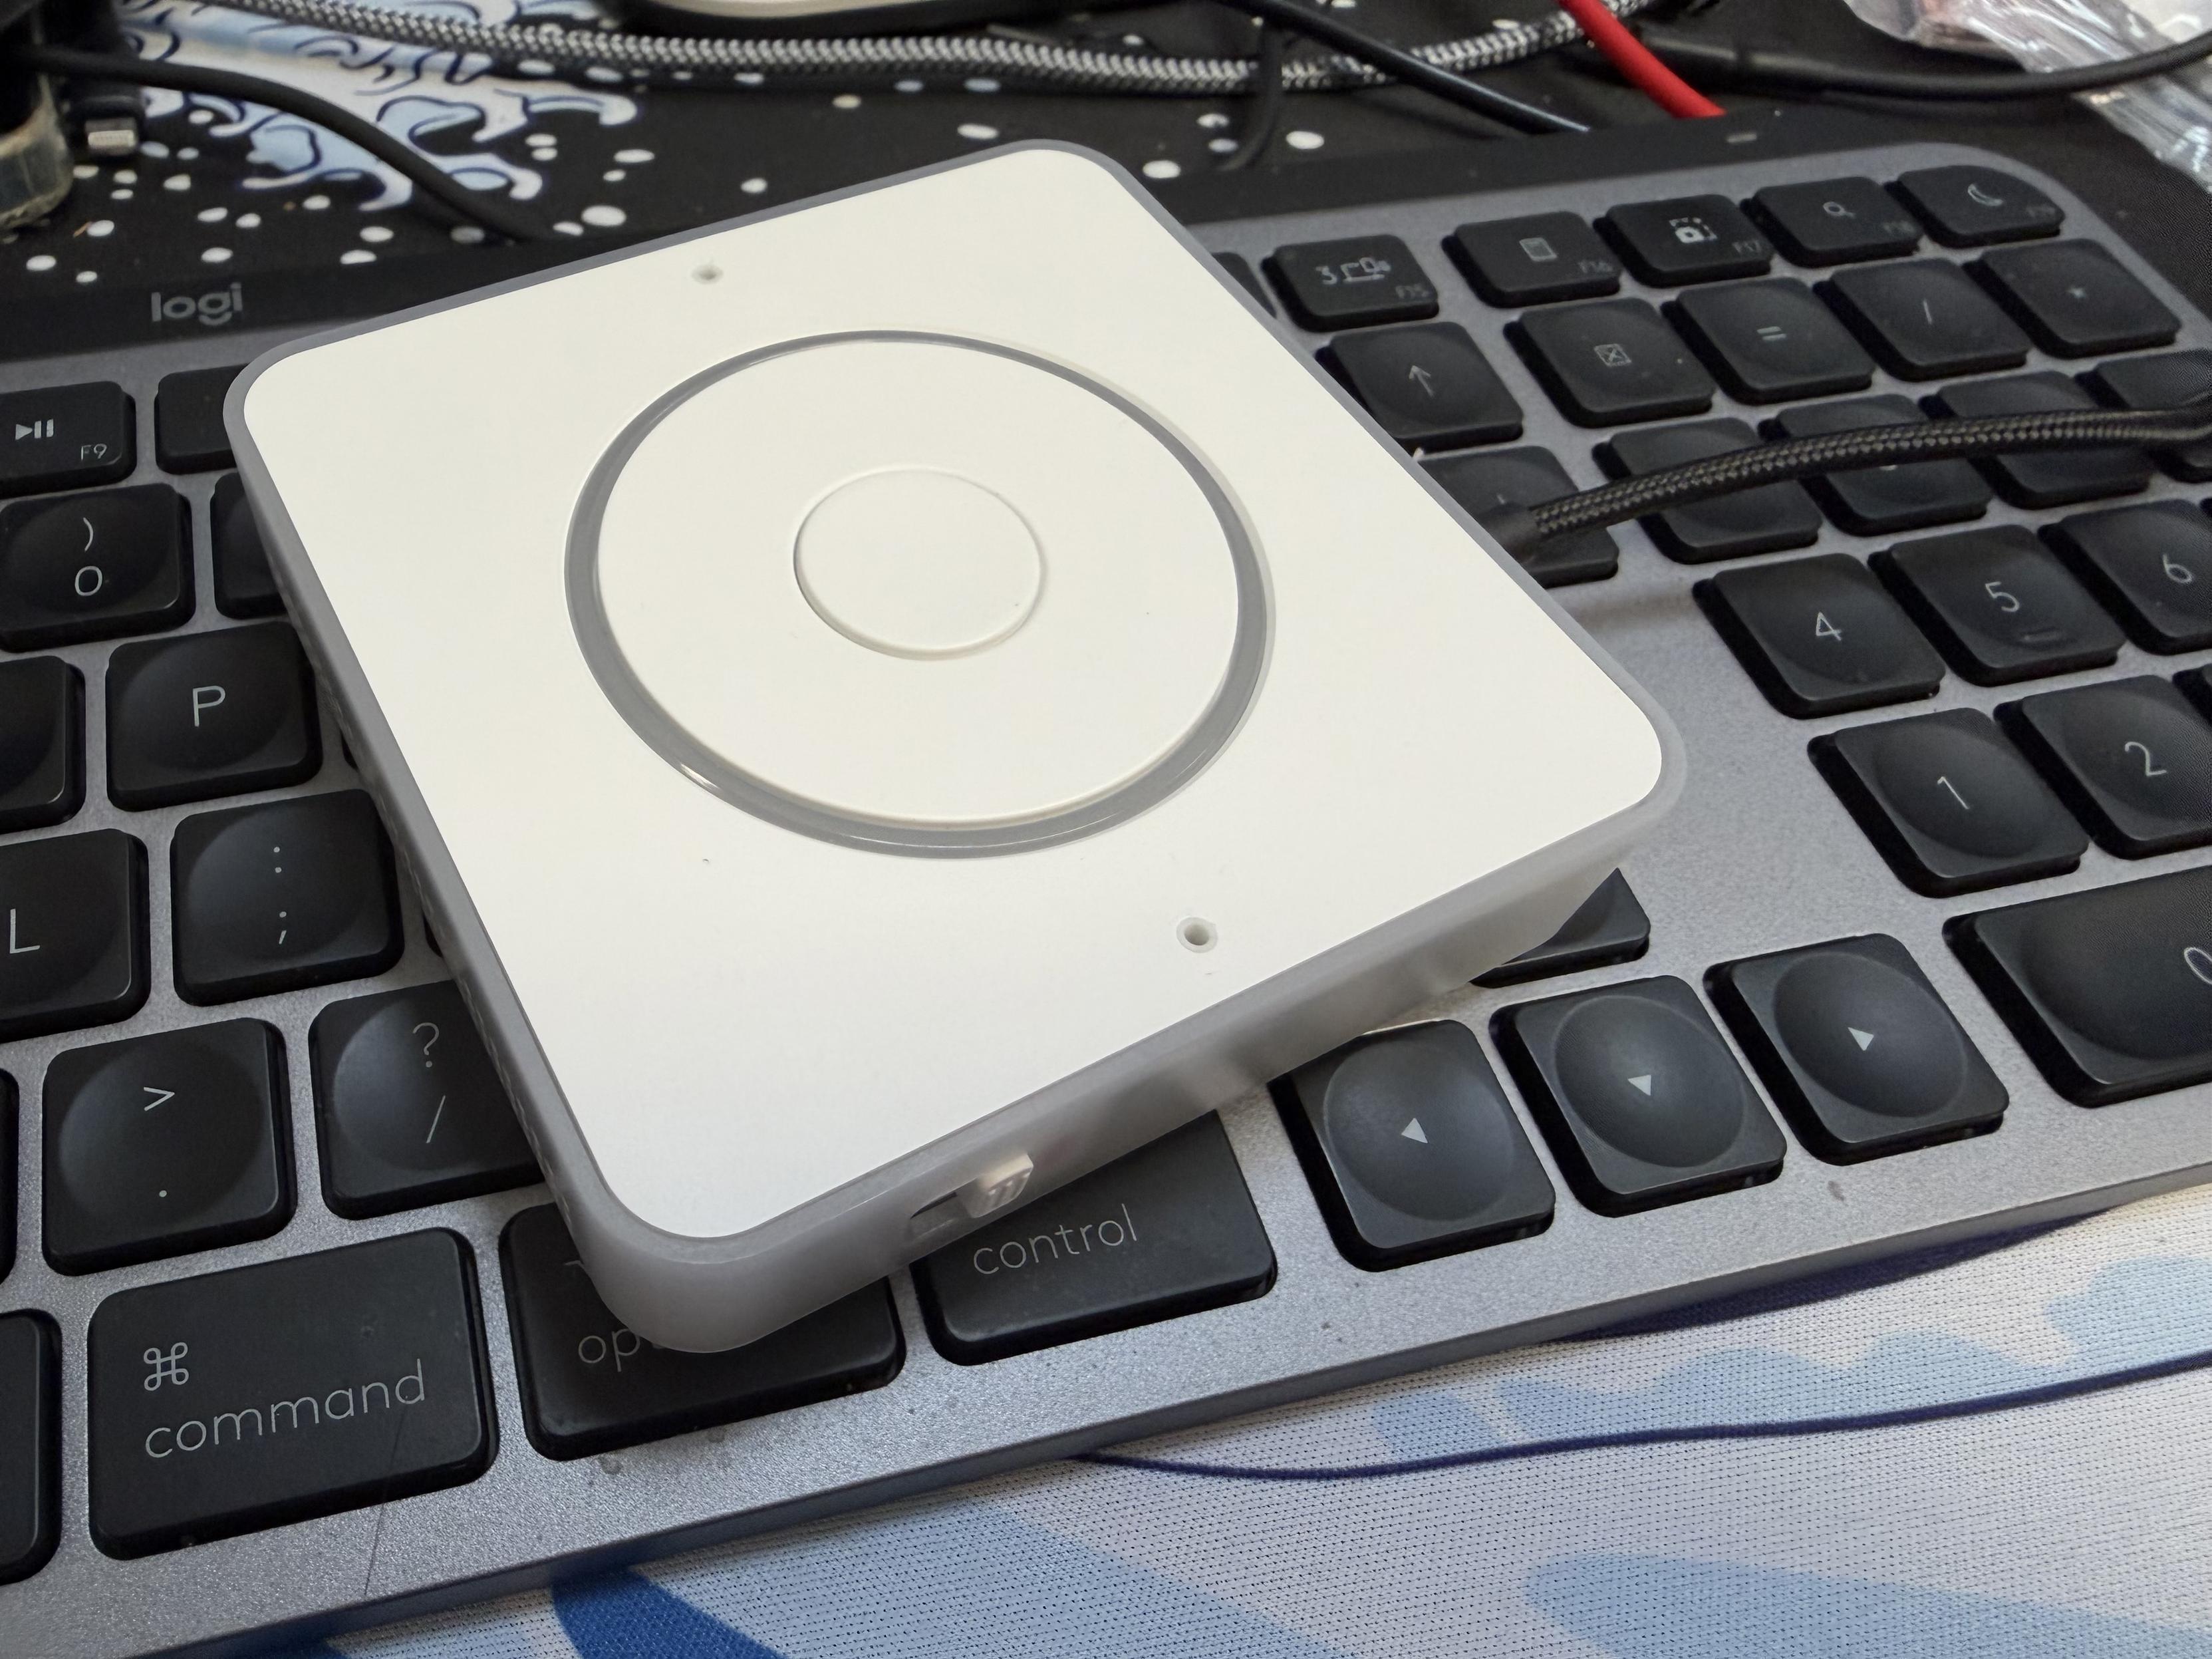
Local speech devices being set up and configured. #homeassistant
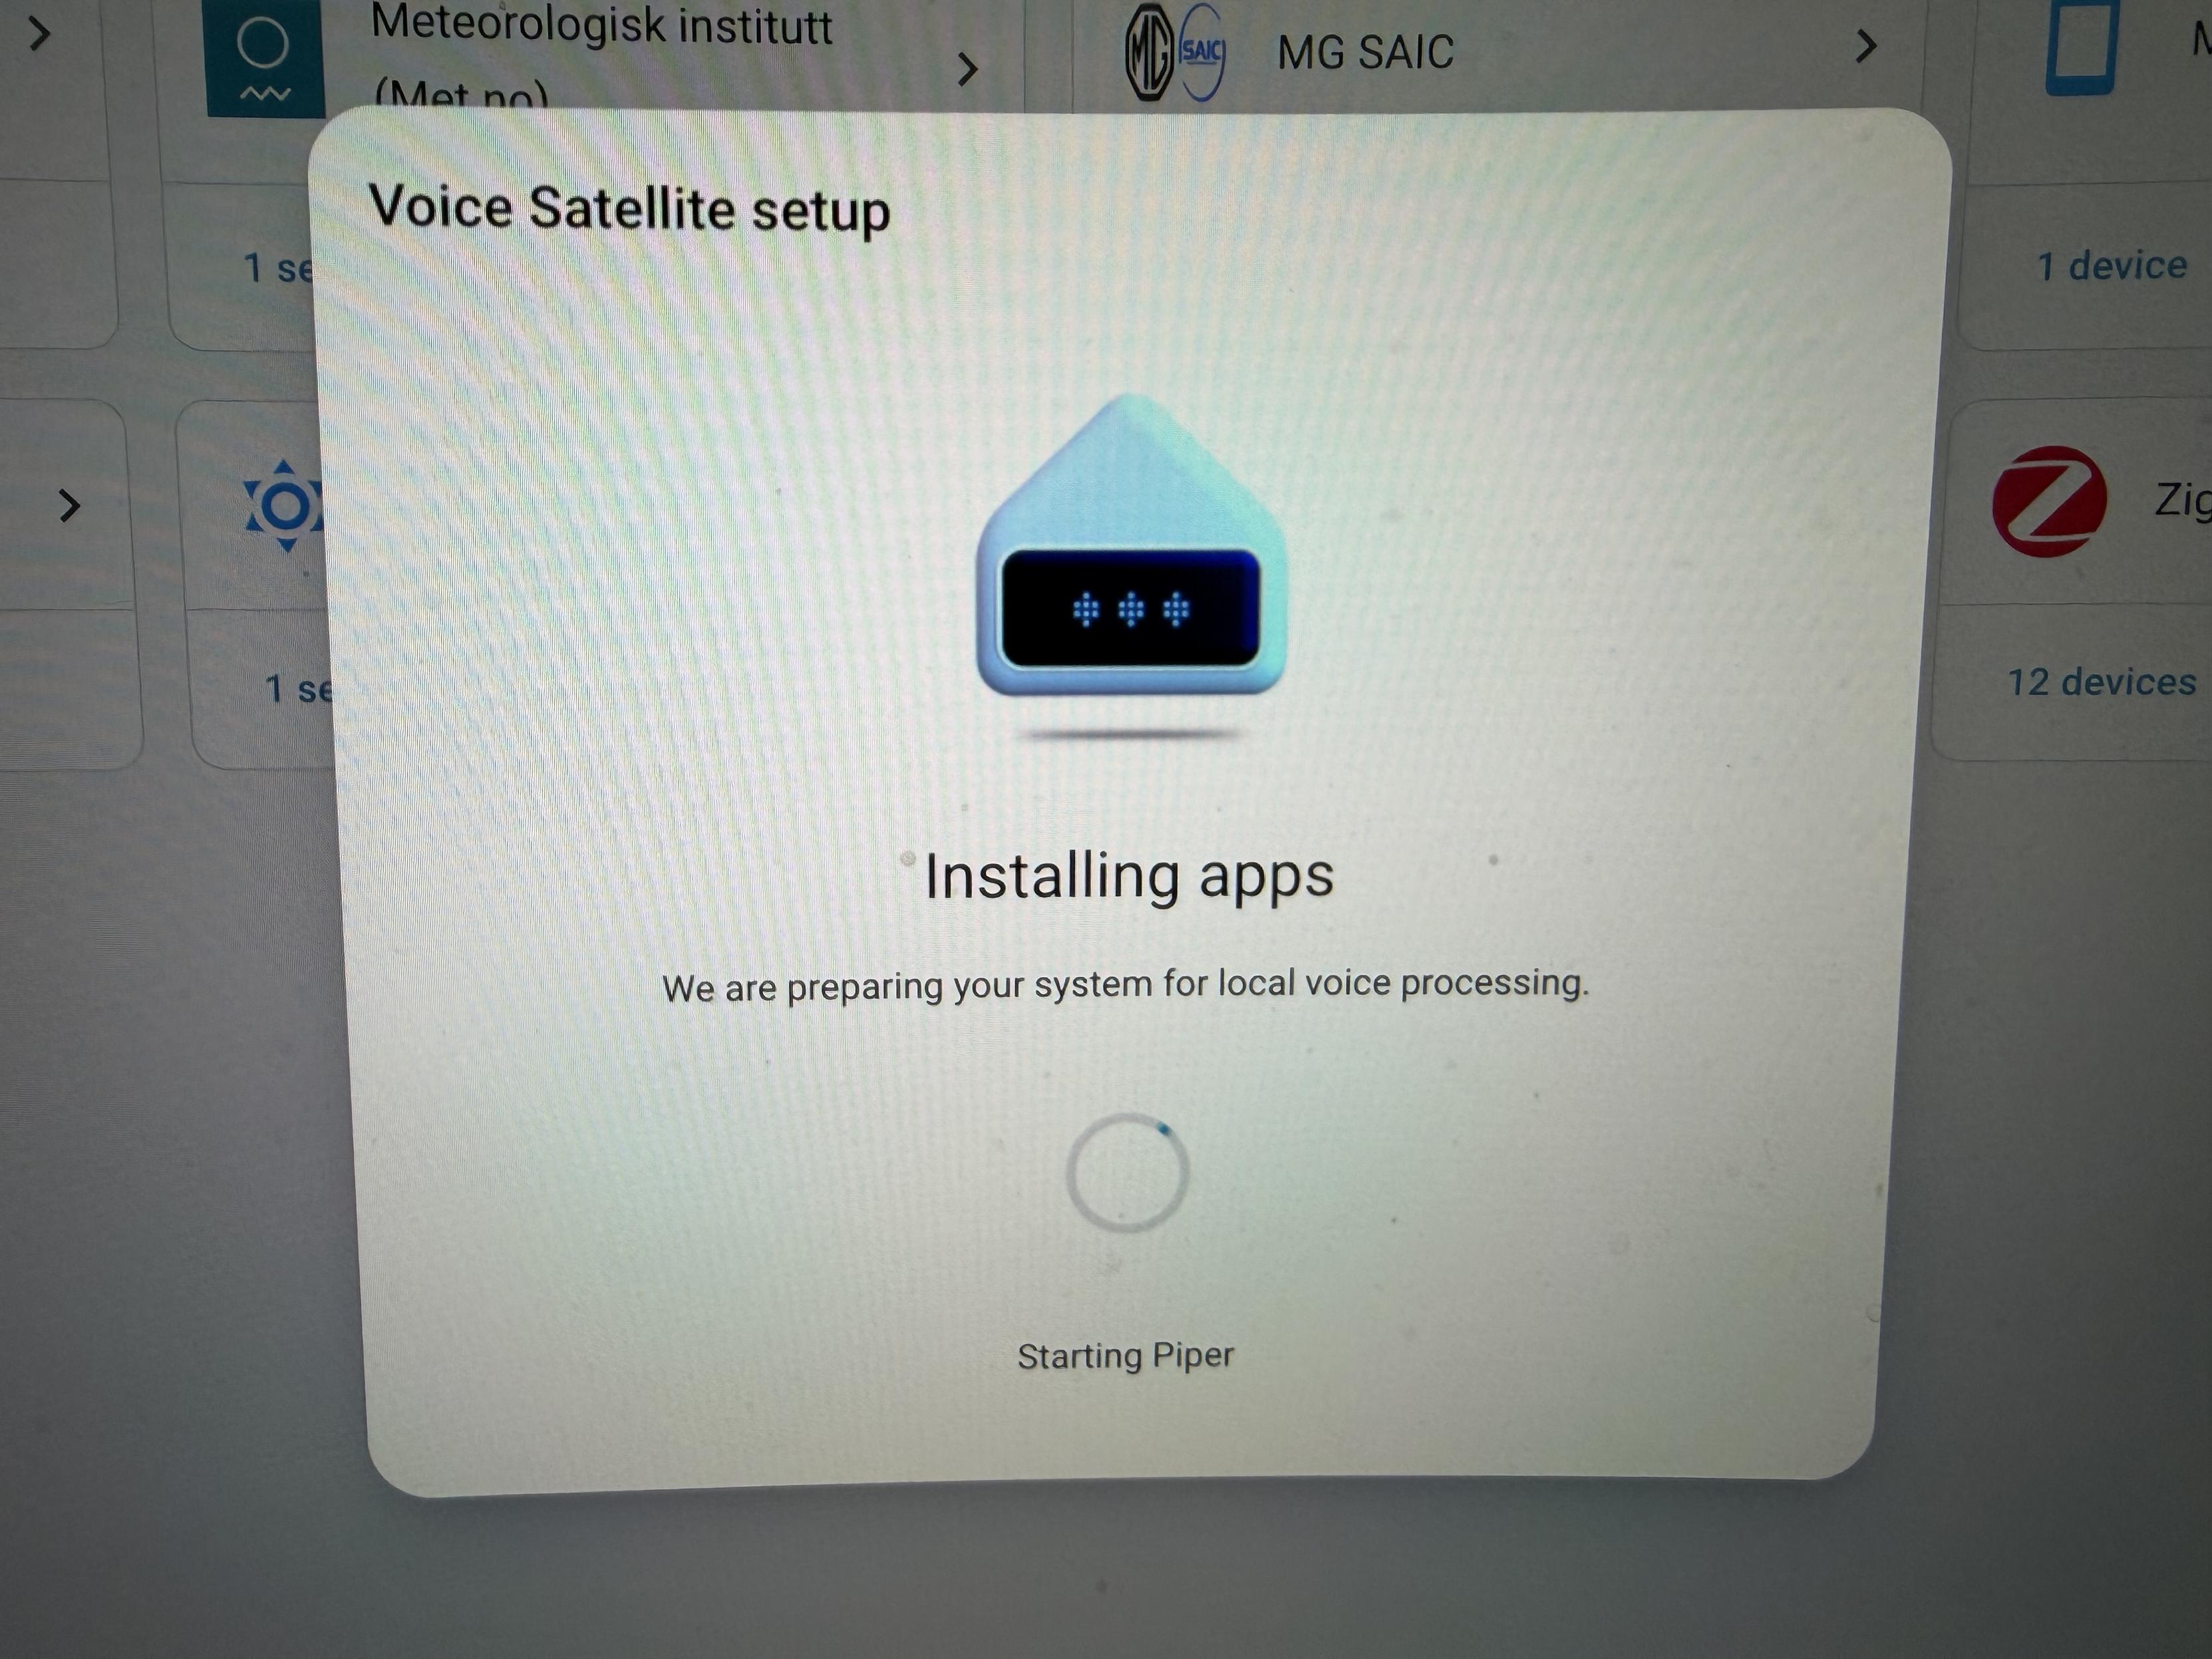
Alt...
Setup screen on home assistant voice
Alt...
Home assistant voice device
![[?]](https://cdn.masto.host/socialscreamingatmyscreencom/accounts/avatars/108/204/527/228/686/440/original/9dab8e6f6621a27f.jpg)
Quick write up how to setup Home Assistant to monitor if the washing machine is running using a smart plug and sending a push notification when it’s done. #homeAssistant #selfhosting #selfhosted
https://www.screamingatmyscreen.com/home-assistant-washing-machine-monitor/
![[?]](https://asset.circumstances.run/accounts/avatars/109/303/349/027/443/766/original/613eacda96afa554.png)
Folks, asking for advice.
Is there a device which:
- is an FM radio;
- is a BT speaker;
- can play internet streams;
- doesn't need to have an internet connection/external cloud service to be controlled through application/API;
- is available on EU market;
- doesn't cost arm and leg?
Bonus point if it is controllable through #HomeAssistant.
![[?]](https://media2.ai6yr.org/accounts/avatars/109/321/592/360/914/018/original/f918064fa4350d36.jpg)
Random question on irrigation for the Fediverse. In-laws house has an old Hunter irrigation controller which appears to have been designed in the 1980's and requires an engineering degree to program, considering a more modern controller... but not one that requires any subscription and can run independent of the cloud if needed -- but can also support app-based programming and/or integration with HA or other DIY tools. Does such a thing exist? Bonus points for cloud-is-optional. Rachio? Orbit? etc. etc.?
(I do have an engineering degree, had to reprogram the thing for them after they had to change out all the leaking valves).
![[?]](https://static.mamot.fr/accounts/avatars/000/007/691/original/bb74e88e307013f8.jpeg)

![[?]](https://assets.chaos.social/accounts/avatars/000/086/780/original/7699ff6b67e4070f.jpg)
Suche ein #Linux UI, das mit merkwürdigen Auflösungen zurecht kommt.
480 x 1920
Mint und #Cinnamon ist leider raus.
Ist da vielleicht #Gnome das UI der Wahl?
Eins zufällig damit Erfahrung?
Will nur einen Bowser haben, der mir #HomeAssistant anzeigt, so wie im Bild.

Alt...
Kleiner Hochkant Monitor, der Gauges aus HASS anzeigt
![[?]](https://files.mastodon.social/accounts/avatars/000/007/112/original/388649acb2026701.webp)
Hmmm. Apparently #HomeAssistant can control some #Tuya devices locally.
But I was "clever" and put all of my #IoT devices on an isolated WiFi network so they can't reach anything else on my LAN.
Like, for example, the server hosting HomeAssistant…
It is functionally impossible to sensibly design a home network for IoT devices - as I wrote a decade ago.
https://shkspr.mobi/blog/2016/03/designing-a-home-network-for-hostile-devices/
If you have sensible advice on how you personally designed yours - please do leave a comment on that post.
![[?]](https://f2.tchncs.de/accounts/avatars/107/965/862/194/510/900/original/a91ae8dd71c4db80.jpg)
Ich hab hier nen Laptop rumliegen der jetzt nicht so super viel Strom braucht und den könnte ich doch als Home Assistent Basis nehmen, oder?
Und wo ich grad dabei bin ein altes Motorola Smartphone als Stromampel...
![[?]](https://files.mastodon.social/accounts/avatars/110/966/718/965/472/697/original/fac2bee55c11faab.jpg)
Here's the updated version without the em dash:
🚀 Tech Talk is back!
Ever wondered how to monitor your smart home like production infrastructure? 🏡
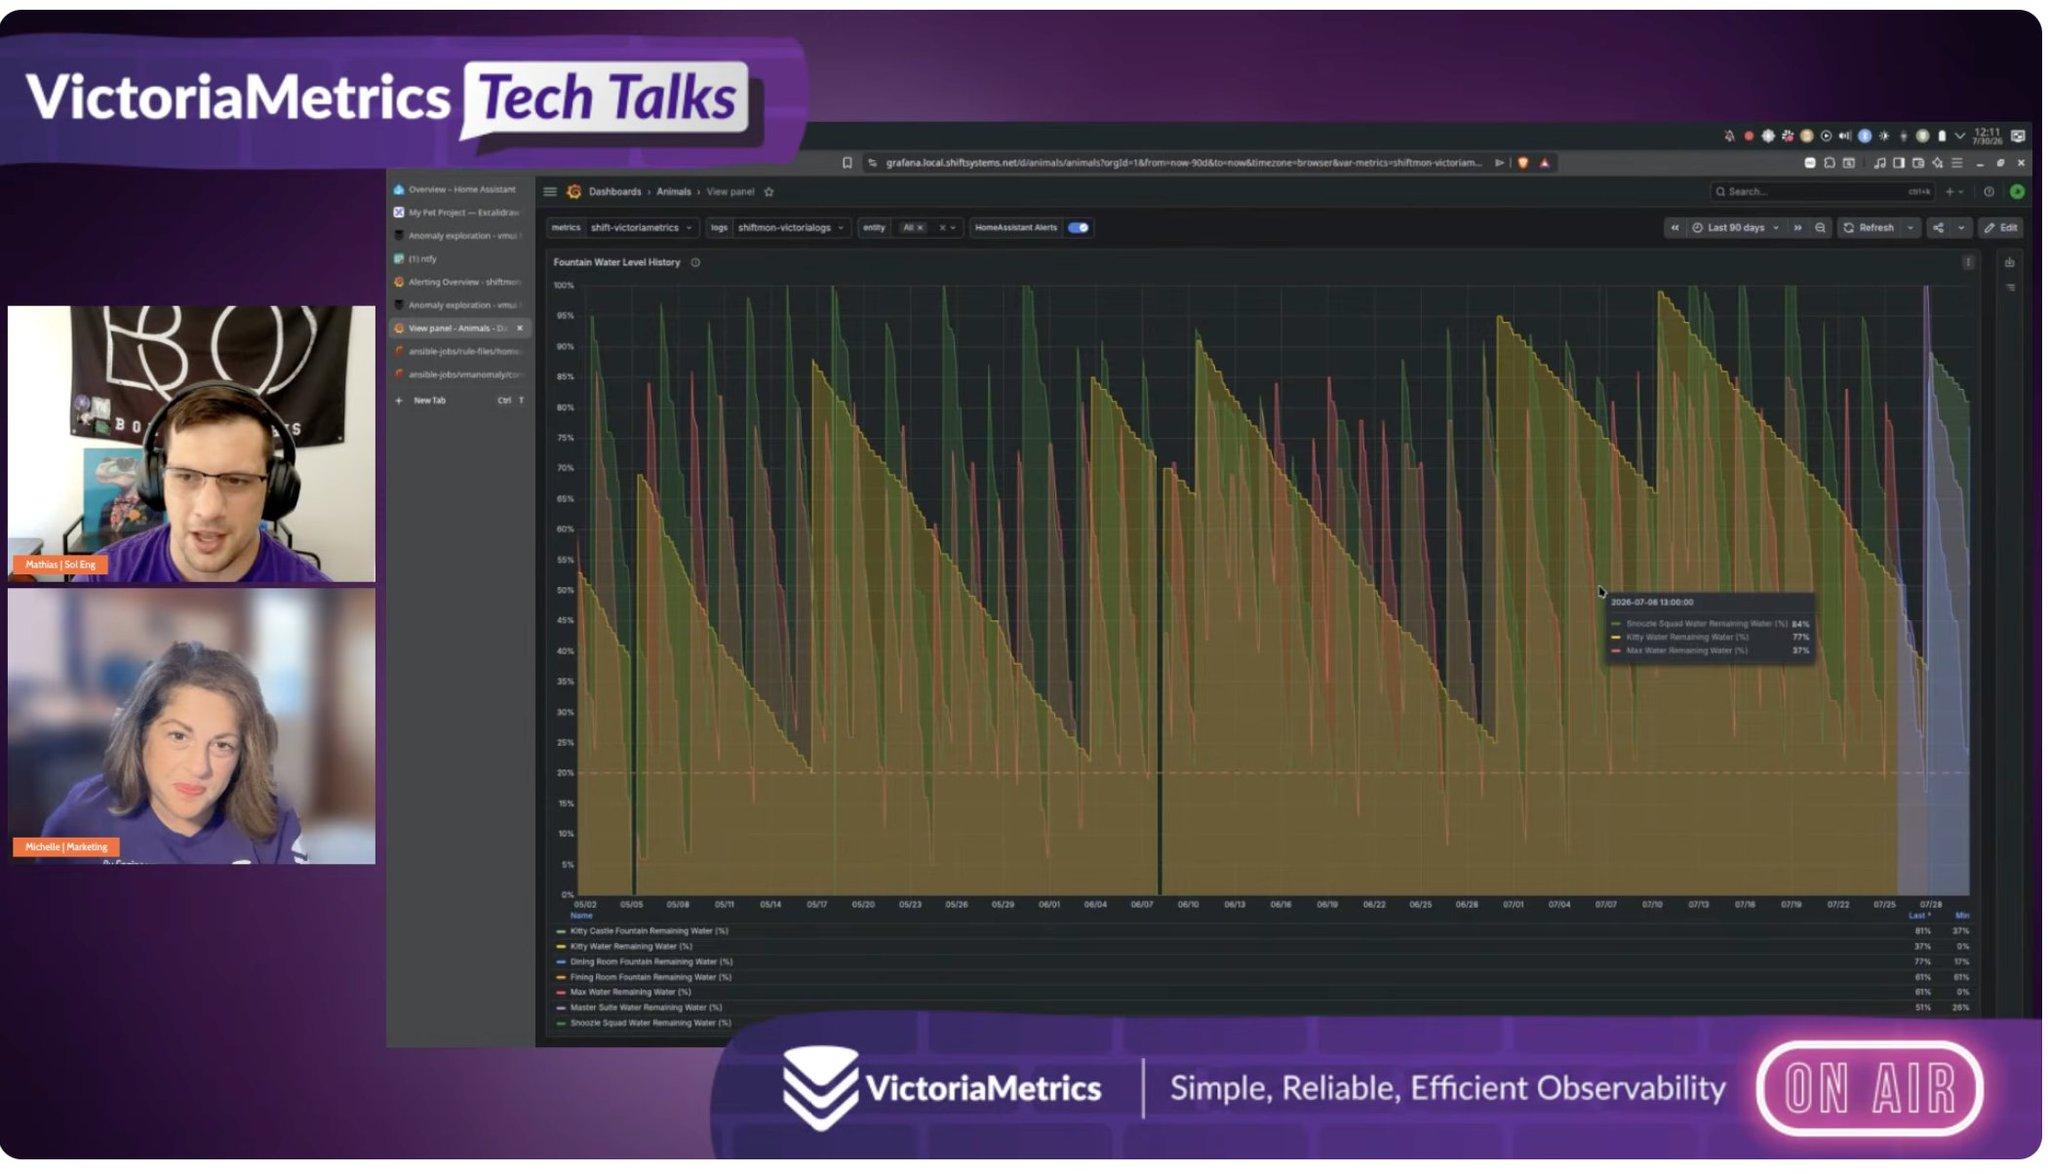
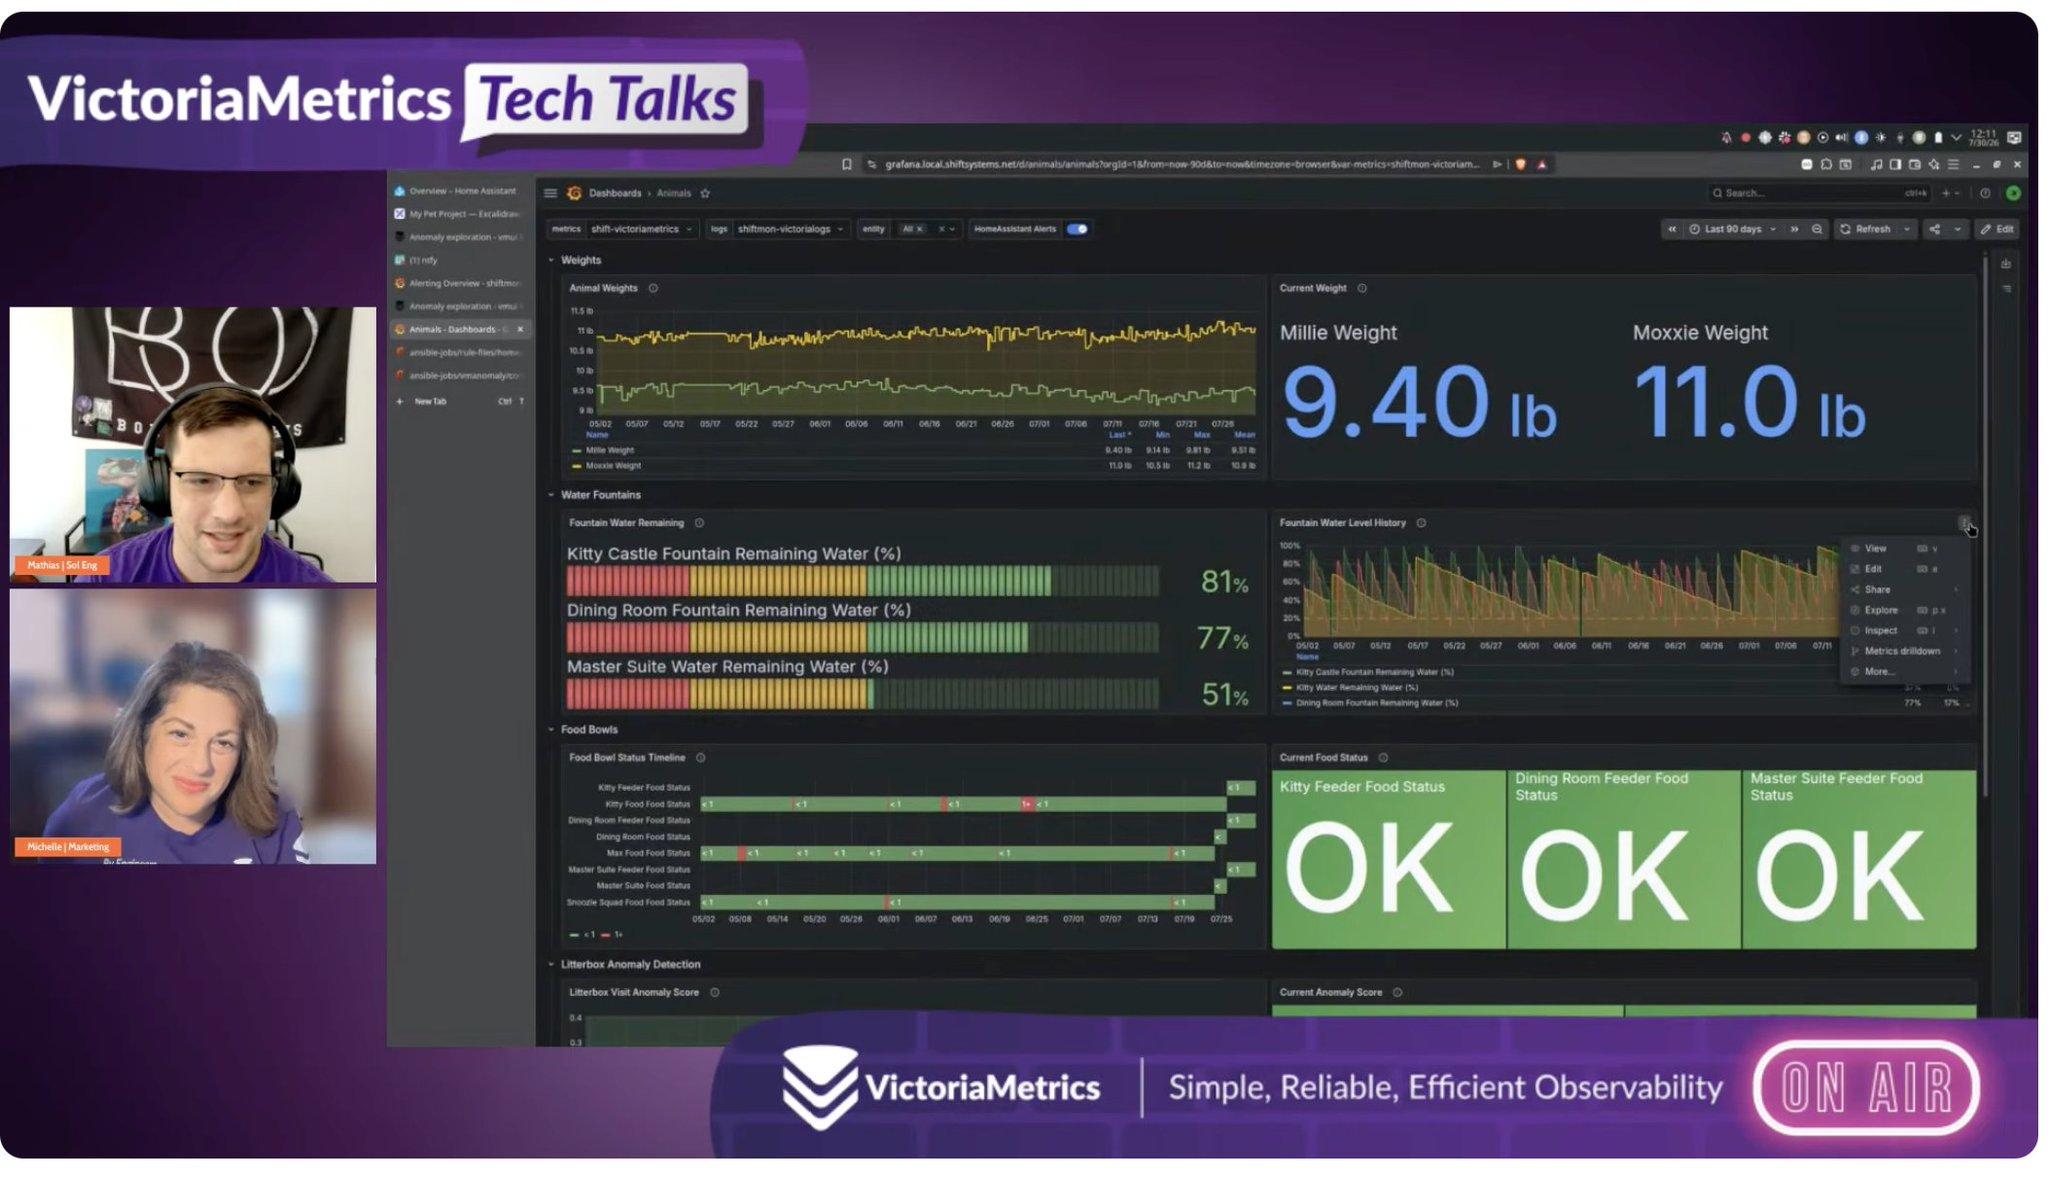
Join Mathias as he shows how he uses #VictoriaMetrics with home_assistant to keep an eye on what really matters, including pet water fountains, food bowls, and other home automation #metrics.
Watch it live 👉 https://www.youtube.com/live/n_aN4Z2Eb8I?si=E8fG-rl2Zuq8_YRC
#HomeAssistant #OpenSource #Monitoring #Observability

![[?]](https://mypocketpals.online/files/1e025f92-1c06-472d-98f4-f161be148b63.gif)
For less than $100 in parts(and some FOSS projects) I can get two different smart speaker configurations to test and an HDMI (720p only) Chromecast option.
If these work out, I'll start down my #HomeAssistant journey and being replacing my #Chromecast and mini speakers... #ESP32 #m5stack

Alt...
This image displays a partial list of five M5Stack products with their names and prices in an online shopping cart interface. Each entry has a small device image on the left, an M5STACK logo above it, and text on the right. The first item is AtomS3R AI Chatbot Kit (8MB PSRAM), priced at $21.50. The second item is ATOMIC Display Base (GW1NR), priced at $19.95. The third item is AtomS3 Lite ESP32S3 Dev Kit, priced at $7.50. The fourth item is ATOMS3R Development Kit with 0.85-inch Screen (8MB PSRAM), priced at $17.50. The fifth item is Voice Pyramid Smart Speaker Base without M5Atom, priced at $24.50.
Our Tech Talk is back, hosted by Michelle Sebek - Head of Marketing NA.
We're kicking it off with the most honest demo environment there is: a real house with real pets. 🏡🐈
Mathias, one of our Solutions Engineers, has one rule for his smart home: he should be the only reason the lights don't turn on. Not a cloud outage. Not a vendor abandoning a perfectly working device.
Everything runs locally:
🏠 #HomeAssistant
📊 VictoriaMetrics
📂 Alerting rules in #Git
📲 Notifications through ntf

![[?]](https://media.burningboard.net/accounts/avatars/109/892/422/024/311/931/original/f22e604f554272c0.png)

New on the blog: my Home Assistant setup on FreeBSD.
Home Assistant OS runs in a bhyve VM, but bhyve has no USB passthrough, so Zigbee2MQTT and Mosquitto live in a VNET jail with the ConBee II.
Homematic comes in via a CCU3, and three IKEA Matter-over-Thread devices use my Nanoleaf Shapes controller as their border router.
Three radio ecosystems, 474 entities, one dashboard.
#FreeBSD #HomeAssistant #bhyve #Zigbee #Matter #Thread #SelfHosting
![[?]](https://snac.smithies.me.uk/justine/s/avatar-270304302821a87b50026a5768a00c56.png)
![[?]](https://static.piaille.fr/accounts/avatars/109/303/145/824/207/711/original/d17297193fca82db.png)


Bon.
Y a plus rien qui fonctionne avec Zigbee, j'ai tout essayé, reconfigurer le réseau, réappairé les appareils, plus rien ne remonte, et je ne sais pas pourquoi. En restaurant la dernière sauvegarde de #HomeAssistant, je pensais que ça se passerait bien, mais non. Ça fait 5 heures que je suis dessus, j'en ai marre.
Donc, j'abandonne, j'en ai ras le cul.
![[?]](https://static.piaille.fr/accounts/avatars/111/200/472/431/573/502/original/0f8065862cd91296.png)
Weekly #20 en ligne.
Au menu cette semaine :
- AWS et Azure dans le viseur du DMA
- identité en ligne et vérification forcée
- ATProto comme piste d’identité portable
Mes données #HomeAssistant ont à nouveau été entièrement réinitialisées à 4h10 ce matin. J'abandonne.
![[?]](https://mastodon.me.uk/system/accounts/avatars/109/264/670/017/475/803/original/7eb37a8aaeb05e67.png)

So, anyway, I opened the office door and was met with a wall of heat. And the sound of screaming fans.
I sat at my desk and everything I touched (seat, desk, keyboard etc.) was hot. I was drenched with sweat within minutes.
Needless to say, #homeassistant has been edited, the frost protect range has been changed to 5-10 and the sliders have been replaced with input boxes.
7/n
Sit back, listen to my tale and laugh at my discomfort....
My office is controlled by #homeassistant - heating, lighting, a few of the power outlets, a wall fan, presence sensors, temperature sensors and a few other things.
AC is by way of a portable floor-standing unit which can only run when the office is occupied due to needing to vent out of a window - control of this is therefore manual.
1/n
Now, heating is by way of two wall mounted electric convection heaters. #homeassistant turns them on and off depending on what various limits have been set at,
To make sure that the heaters don't come on when they're not wanted, there is a 'master' switch. All the automations only act if the master switch is enabled.
All except one.
3/n
![[?]](https://media.infosec.exchange/infosec.exchange/accounts/avatars/000/070/798/original/d20ead2f85c91066.jpg)
Funny #homeassistant story. When I first started exploring #homeautomation I bought a basic WiFi plug. I wasn’t sure what to do with it, so I put it on the kettle. The idea was to set it up so someone could start the kettle from bed and know that it was ready by the time they got downstairs.
But, in practice, nobody really took to that. Eventually I found a living room lamp that had a switch that’s annoying to turn on. So I moved the plug there.
It’s still called “Kettle.” So if you say “Alexa turn on the kettle,” the light in the living room will come on. It’s amusing so we have left it like that. For about 6 years.
@byteguard I have both an echo and the #homeassistant voice unit. The echo does natural language processing. So it handles “turn on the dining room lights” and “turn on the lights in the dining room” and “turn the dining room lights on.”
HA voice needs a specific syntax. “Turn on the [specific name]”. It works. It’s great. But you have to do things its way. Converting to HA voice meant going around and renaming objects in HA to have intuitive names I wanted to say out loud. I didn’t realise that my dining room lights weren’t working with HA voice because I had named the device “DiningLights” in HA.
![[?]](https://stockage.framapiaf.org/framapiaf/accounts/avatars/000/002/537/original/40d8ac150e698515.png)
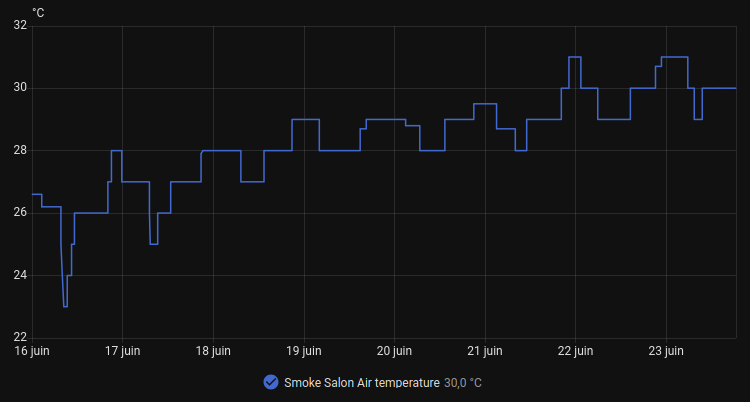
Tous les jours, je gagne +0.5° dans mon salon. On arrive plus à rafraîchir...
#Canicule2026part2 #HomeAssistant
Alt...
Courbe de température d'un capteur dans le salon. On voit une courbe bleue qui ne fait que monter depuis le 16 juin. Jusqu'à dépasser 30°
My #homeassistant VM died when my NAS died. Eventually I will recover the NAS. But in the mean time I used the backup that nabu casa makes. Completely painless. Spun up a new VM running HAOS, restored the backup, and then a little bit of reconfiguring of devices. There's one set of backups tested!
![[?]](https://files.mastodon.social/accounts/avatars/108/288/607/816/054/957/original/44ef33fd13454e94.png)
The new Home Assistant OS release adds faster disk image flashing, VM image improvements, and updated Linux kernel support.
https://linuxiac.com/home-assistant-os-18-0-released-with-linux-kernel-6-18-lts/
Alt...
The new Home Assistant OS release adds faster disk image flashing, VM image improvements, and updated Linux kernel support.
I built my pool controller on #ESP32 so that I could control it with #homeassistant. Worked great. I was so proud. It had been the least reliable bit of #homeautomation in the house. (Because it was the bit that I had the majority role building 😜)
Then a combination power strike/UPS failure took out my #NAS running #TrueNAS. That NEVER happens. So instead of being super convenient, I spend my weekend trying to rebuild the NAS.
I lost one of the pair of NVMe boot drives and at least one of my SAS spinning rust drives is not working. “zpool import -F -n hope” runs for about 30 seconds and then I get a kernel panic and reboot. I am not a happy camper.
![[?]](https://cache.treehouse.systems/accounts/avatars/114/460/123/480/601/911/original/89221d2f1e48d270.jpg)
PineVoice Release Announcement
Well, it's finally here. After two years of hardware and software development we are happy to introduce to you, the PineVoice (formally PineVox) Home Assistant speaker. The PineVoice features on device wake word detection, a dual microphone array, hardware volume and microphone cut off/mute buttons. The firmware also supports the Wyoming Satellite protocol.
In terms of hardware specifications we are looking at:
* CPU: Bouffalo BL606P (1x T-Head C906@480 MHz, 1x T-Head E907@320MHz)
* Memory: 32 MiB pSRAM, 788KB SRAM
* Storage: 16 MiB Flash
* Wireless: Wi-Fi 802.11 b/g/n, Bluetooth 5.x Dual-mode (BT+BLE)
The speaker can be used on your own local cloud or you may decide to use Home Assistant’s cloud service instead. Pair it with a Quartz64, Rock64 or Avaota A1 to host your Home Assistant instance (hey, that rhymed! XD).
Additionally, the PineVoice has an optional Zigbee dongle accessory to plug into your server running Home Assistant. This allows Home Assistant to see your Zigbee smart devices, but is completely optional if you don’t use Zigbee.
Finally, the software for the PineVoice is not final and will see improvements in the future. Full transparency here, we were pinned to the wall with a strict production deadline. What is shipping works well but with some issues such as wake word detection. We are looking to use a better model for it in the future.
On behalf of everyone in the community we'd like to thank @gamelaster for their hard work on the PineVoice firmware. It would not have been possible to release the device at all without him. Someone surely owes him some sort of drink at least. Lets give a cheers to Gamiee!
The PineVoice is currently on sale for $49.99 USD and the Zigbee dongle is selling for $14.99 USD.
Links:
https://pine64.com/product-category/pinevoice/
https://wiki.pine64.org/wiki/PineVoice
Full blog post coming soon!
![[?]](https://tooting.ch/system/accounts/avatars/109/346/754/979/465/401/original/f6989c806af0459f.jpg)
I just want to move the data from my #HomeAssistant sensors to my #Grafana Cloud instance. This is so convoluted I’m getting convinced the raison d’être of Grafana is to engineer complexity.
Apparently, I need Alloy, because Grafana Cloud cannot connect to HA’s Prometheus API directly. And I had to run Grafana’s Alloy installation script in a Debian container just to get the config file.
And it’s not working because the token Grafana just created is invalid somehow? Fuck you.
Advice welcome.
Je voulais simplement changer mon contrôleur Zwave sur #HomeAssistant. Cela fait près de 2h, et j'ai tout désinstallé.
Autant vous dire que cela ne s'est pas passé comme prévu 😑
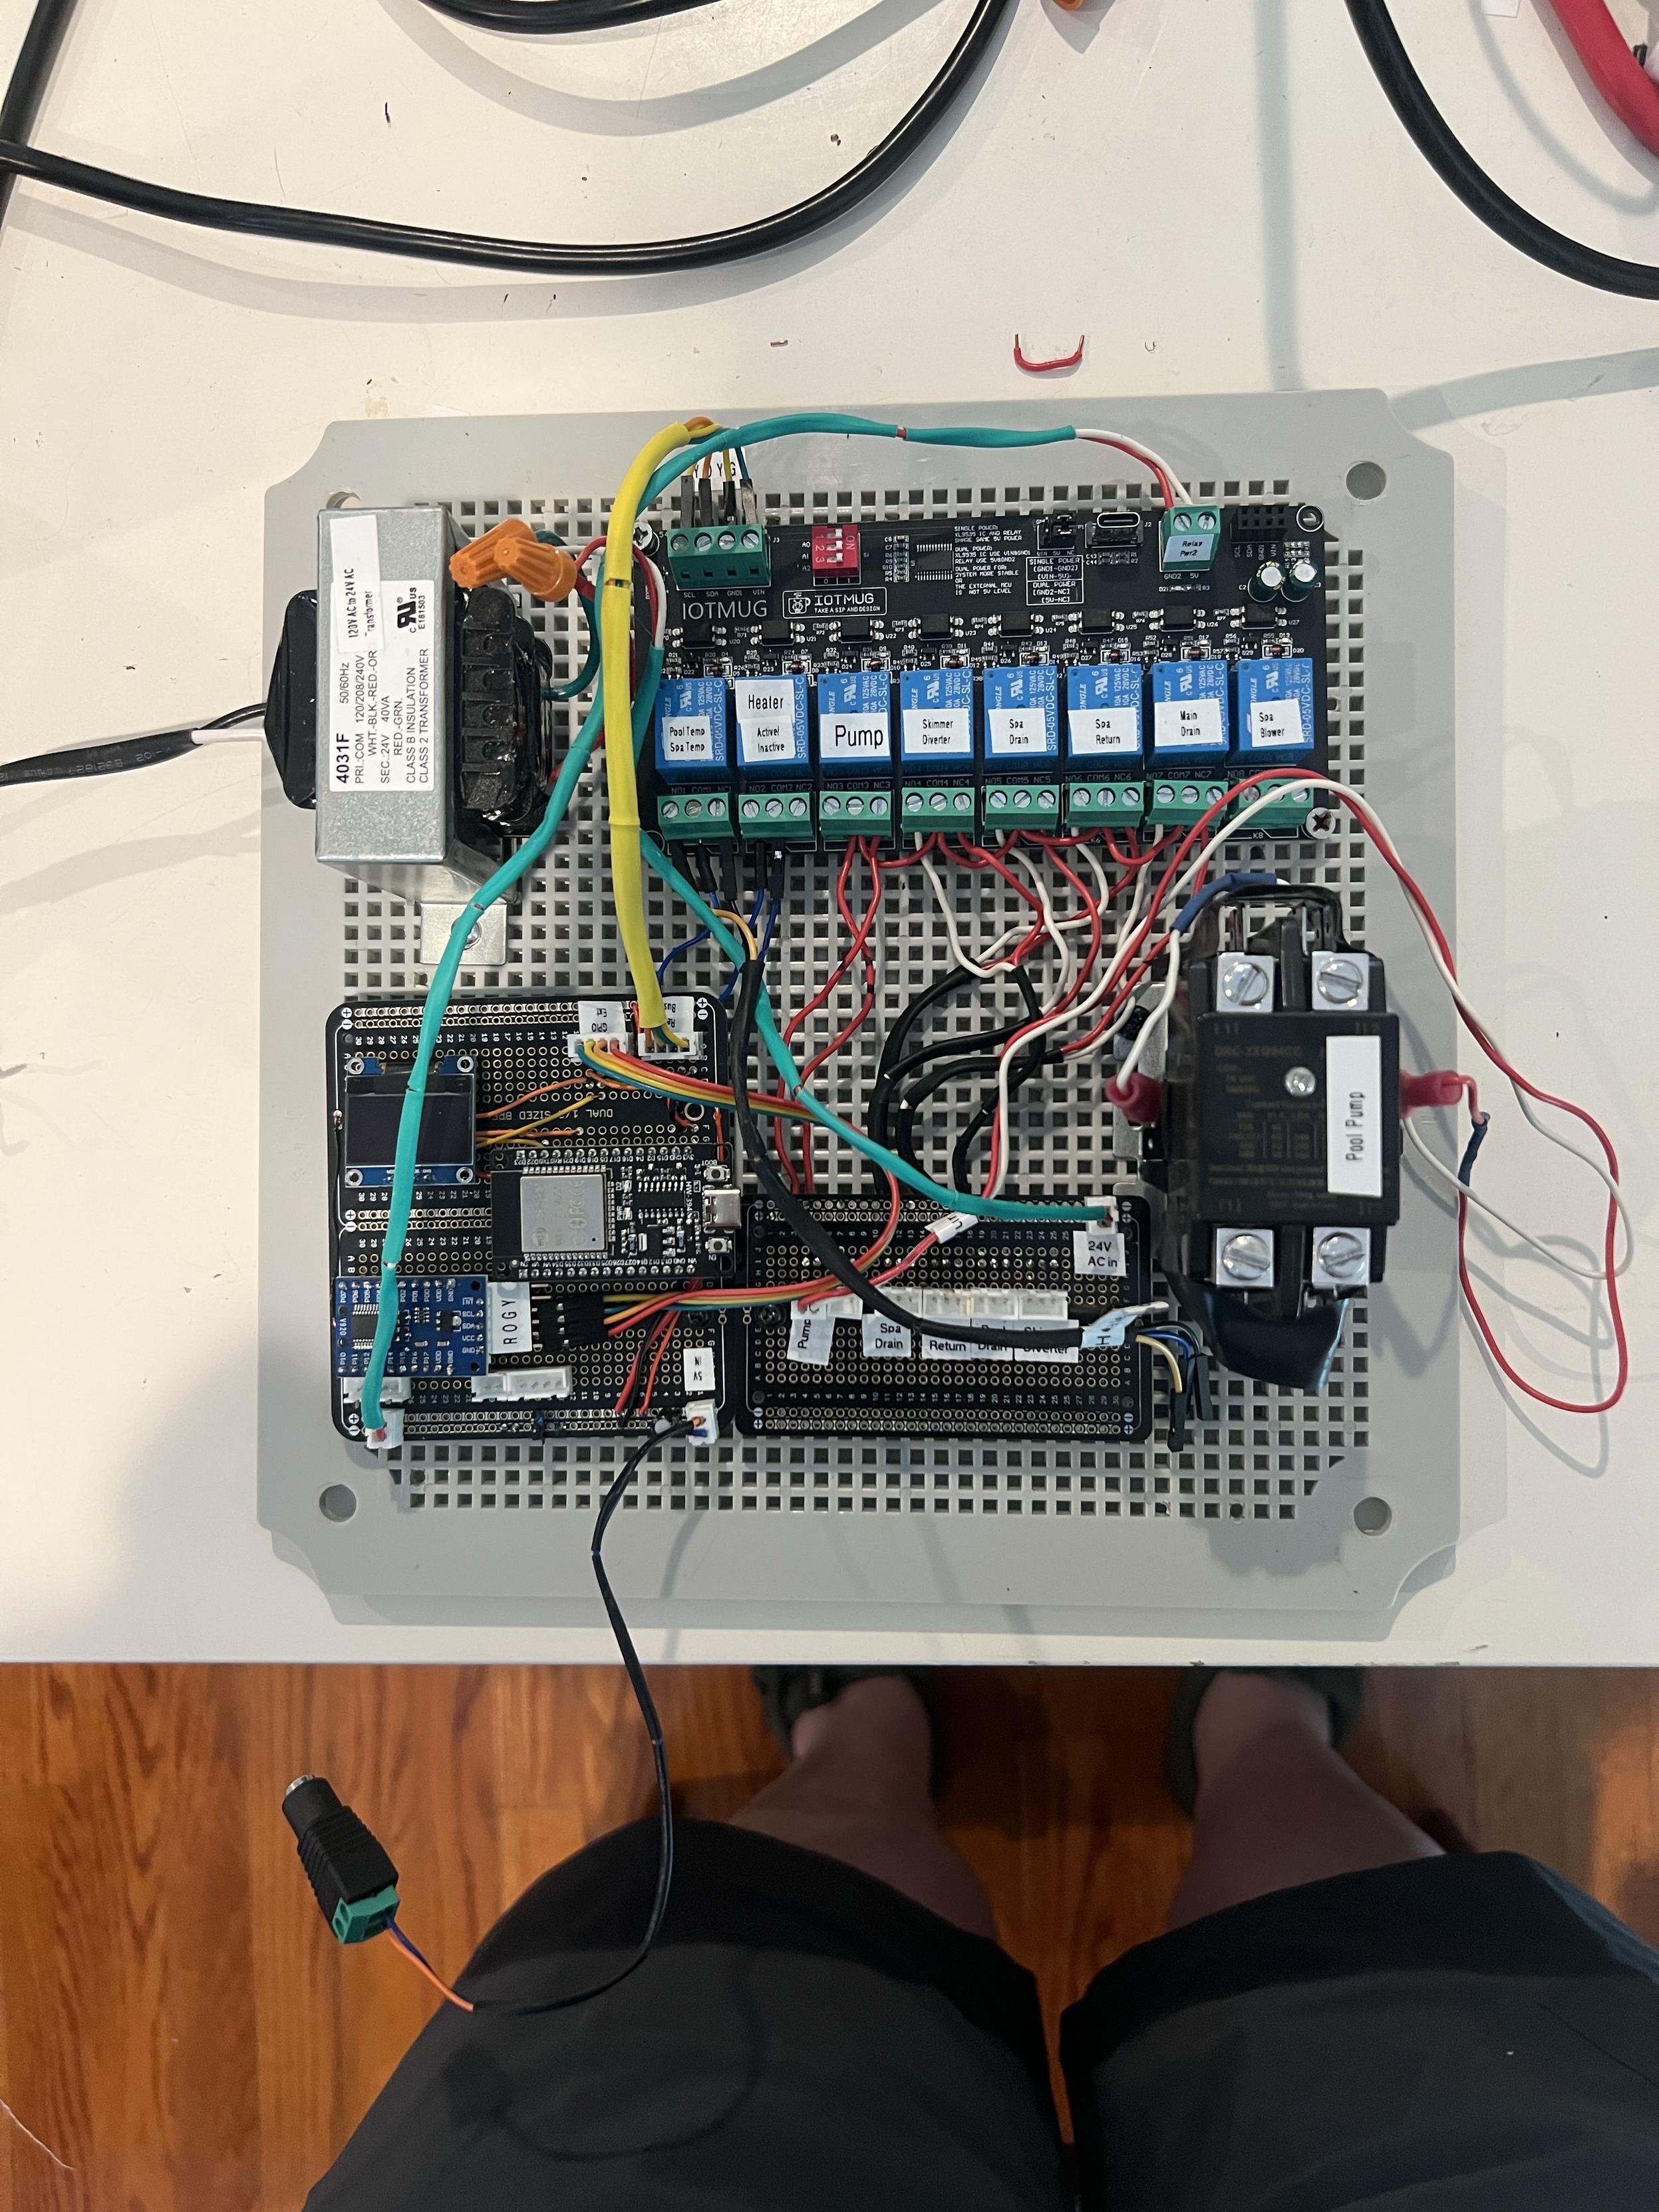
Me and $KID[1] got my swamp castle pool controller(*) fully operational today. I also fixed my blog on Thursday. So I will be able to make a blog post about it soon. For now, here’s the photo of the production build.
#ESP32 At the center, with a bunch of I2C peripherals: an 8-relay board, some 5V GPIOs and a display. It runs #ESP32 and is controlled by #HomeAssistant
(*) I call it the Swamp Castle Pool Controller because of how many times and how many different reasons I have had to rebuild it. It’s from Monty Python and the Holy Grail.
but I built it all the same, just to show 'em. It sank into the swamp. So, I built a second one. That sank into the swamp. So, I built a third one. That burned down, fell over, then sank into the swamp, but the fourth one... stayed up! And that's what you're gonna get, lad: the strongest [pool controller] in these [suburbs].
Alt...
Pool controller board. Top left is a 24V transformer. Top right is an 8-way relay board. Bottom left is the ESP32 on a double wide bread board. Bottom right is a 240V contactor. In the middle on the bottom is a set of JST connectors where the valve actuators connect.
Alt...
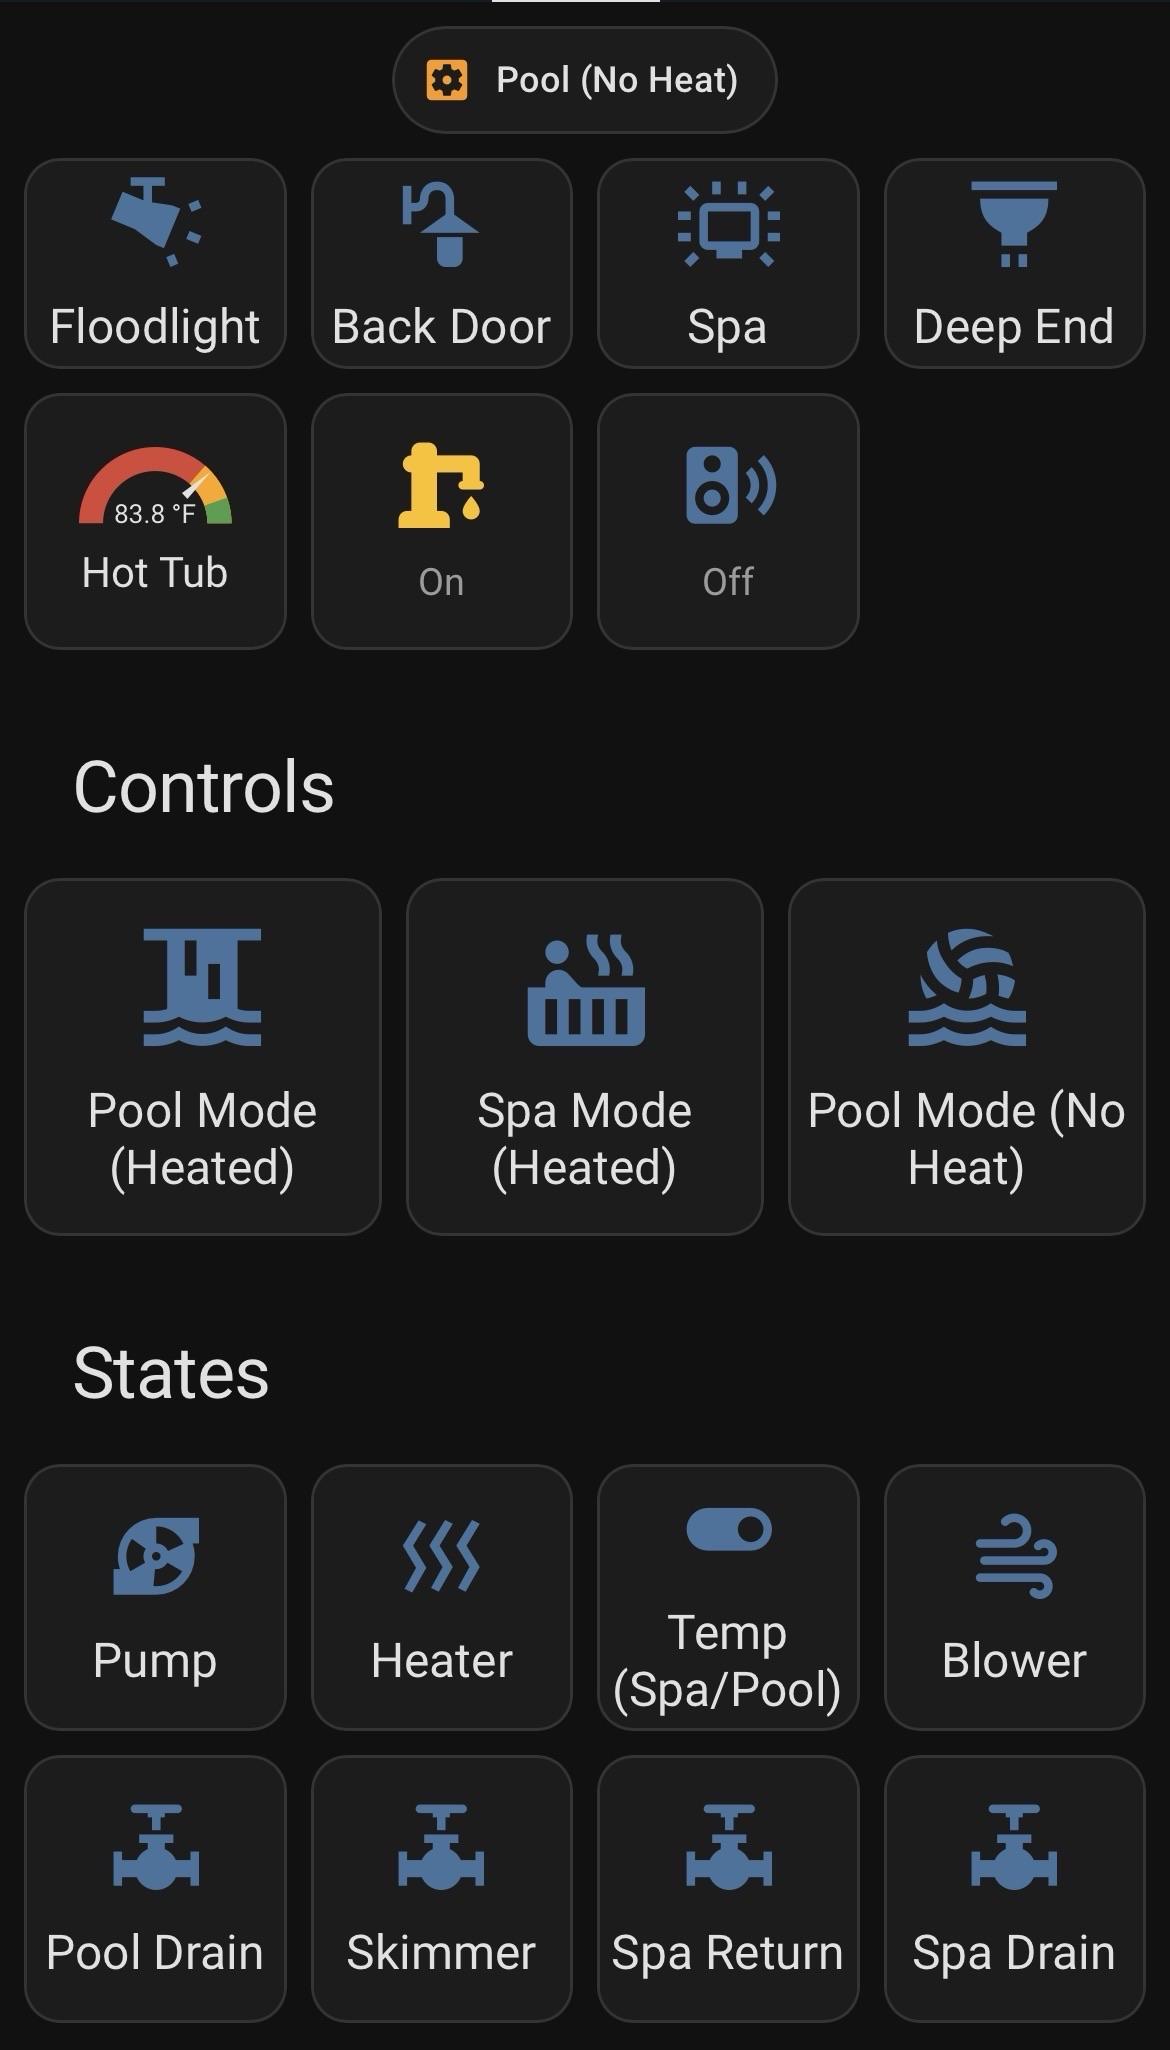
Screenshot of my dashboard in home assistant. It shows some light controls, look settings, and a 4x2 grid of states of the relays.
![[?]](https://f2.tchncs.de/accounts/avatars/000/026/908/original/26ed08fc073e0f61.png)
Yeah. You're referring to Mozilla Common Voice ( https://commonvoice.mozilla.org )
I believe that The HomeAssistant voice assistant uses it in a couple of ways, some non-obvious, ie not just for TTS. From memory, part of their voice recognition training comes from taking CommonVoice samples and adding all kinds of noise and distortion to them that would likely also happen in the real world (background noises, being muffled by objects etc), and then training on those distorted samples.
I contribute occasionally. There's an app on Fdroid that makes it quick and easy.
It's a great project and one I wish Mozilla would focus more on instead of all the other junk.
@nixCraft But doesn't that include things like my #HomeAssistant polling various APIs every now and then?